You are here: Foswiki>Gunwiki Web>ArticleIndexByGun>AboutSu16>AnalysisKelTecSU16 (20 Dec 2011, SeanNewton)Edit Attach
Analysis of the Kel-Tec SU-16
For other SU-16 related articles, visit AboutSu16 Recently, I have been more and more bothered by the fact I've never actually taken apart my SU-16 since acquiring it years ago. This is mostly because I get a lot of searches on TGW for ways to take apart an SU-16, and a few which seem to be asking which AR parts will fit into one. I'd bought my SU-16CA just before the AR-15 "off list lower" thing started, fired a hundred or so rounds through it, and then sort of shelved it once I built a Monsterman gripped AR-15 which could use my full-capacity magazines. Today, I have concluded that I probably made a mistake in not getting to know the SU-16 better than I did. Ever since I bought my SU-16CA (new in box), it's made this horrible nails-scraping-on-chalkboard noise whenever I pulled its charging handle. Until today, I just thought it was its design. I know now that the sound was an unlubricated action spring sandwiched between an unlubricated gas tube and an unlubricated gas piston shaft, all of it merrily rusting together due to Kel-Tec being too cheap to bother oiling the poor thing! By the time I actually took apart this gun the gas system had actually developed a light coat of rust. However, I know that it was unoiled from the factory by the fact that the scraping noise has always been there, and sounded just as bad the day I bought it as it did today. For whatever reason, it seems that Kel-Tec never added a single drop of oil or other lubricant/protectant to this rifle before sending it off! I addressed that oversight today by applying a reasonable amount of CLP to a paper towel, then turning the main spring on the soaked part until the surface rust came off. I also tamped some CLP-soaked paper towels down into the gas tube (using the piston as a tool), then extracted the paper towel plug from the other end by pressing it out with the piston. I also added CLP to each of the moving parts in the bolt carrier. The rifle's action is actually really smooth now, and fairly quiet - which are two things it never was in the past. I'm releasing these pictures with two goals: first, I want SU-16 owners know they have to take apart and oil their rifles immediately, because they can't trust that Kel-Tec actually did so. Secondly, so that it can be noted that despite its severity, the rust never impeded my rifle's operation. The SU-16 scored points with me today for its resiliency, even though Kel-Tec themselves lost several for not oiling it at the factory. To the couple of folks who've emailed asking if I store my SU-16 in a bathroom, shower, or other moist place - no, it's been stored in a dedicated gun room right next to several dozen other guns, none of which have rusted up like this. Considering that the noise was present when I first got the gun, I'm certain that the rust had started before I bought it.The Individual Parts
This is a collection of pictures of individual parts of interest on the SU-16.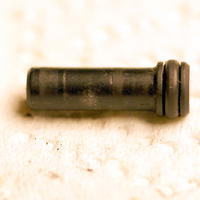 This is the small pin which retains the firing pin on the SU-16's bolt carrier. Notice that there's a rubber ring around the pin, to help lock it in place. This is the counterpart of the AR-15's firing pin retaining pin.
 Top view of the firing pin.
 Side view of the firing pin.
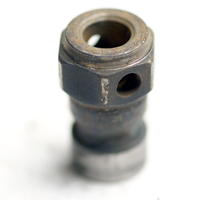 Bottom of the gas piston head.
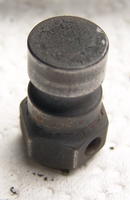 Top of the gas piston head.
 Another view of the back of the gas piston head, along with the pin which holds it into the piston shaft.
 Gas piston body (piston head mounts on this - the pin is held in by spring tension)
 Bolt carrier, where the bolt interfaces with the carrier.
 Rear top view of the bolt carrier.
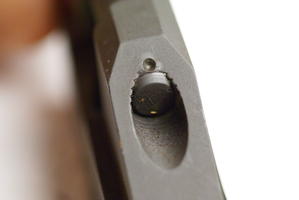 Closeup on the bolt carrier. I suspect the grooves are threads. Notice the indentation immediately above the notch? I strongly suspect this mark is a peen mark used once the gas piston's headspace has been set. Why a piston would be headspaced, however, is beyond me.
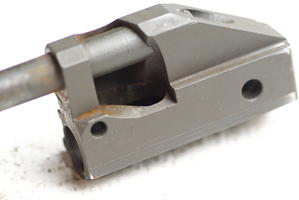 Left side view of the bolt carrier. Notice how the angled groove resembles that of the AR-15? That's because many of the same parts are used across the two.
 This is the stock retaining pin, locked into position. Functionally, it looks like a big staple with the legs bent off at different angles.
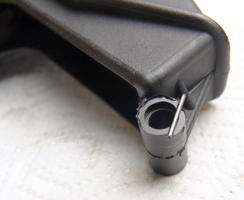 The hole which the stock pin goes into. Notice how the staple-like wire actually rests over the hole when in place. The wire actually fits into the grooves in the stock retaining pin.
 This is the charging handle. Notice the vertical notch? This keeps the charging handle from pivoting while in use.
 This is the bolt, and the part which holds the bolt in place. Both of these parts are similar to, but not identical to, their AR-15 counterparts.
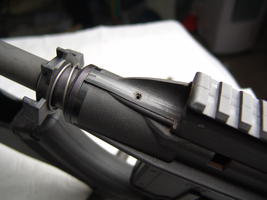
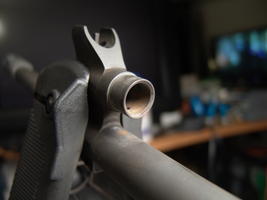
 This is the right side of the bolt carrier, with the side plate installed.
Disassembly
This is a step-by-step guide to field stripping, disassembling, or whatever you want to call the process of turning an SU-16 from a rifle into a pile of parts.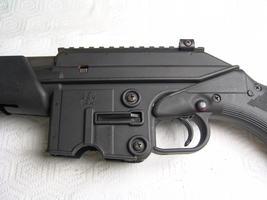 Left side of the rifle, prior to disassembly.
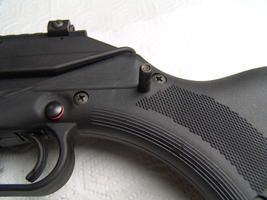 Pushing out the stock pin from the other side.
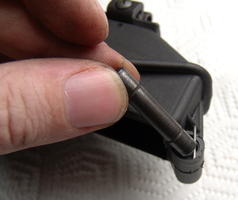 The stock pin, next to the part which retains it.
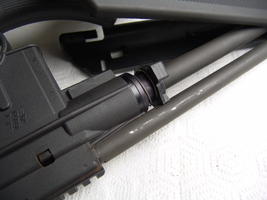 Undoing the bipod clamp and extending the bipod (slightly easier access to the gas tube)
 See the tab on the side of the gas tube? Pull forward on the gas tube and rotate 90 degrees clockwise, and the tab will be vertical.
 When it's completely vertical, it will be able to slide underneath the rail.
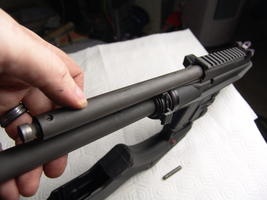 Note that when you've got the tab clear, you need to andle the gas tube upwards a few degrees, then push it back until the bolt carrier is as far back as it'll go.
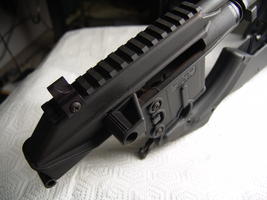 The charging handle will prevent the bolt carrier from coming out completely. Push down on it slightly and pull outwards.
 The charging handle will come free like this.
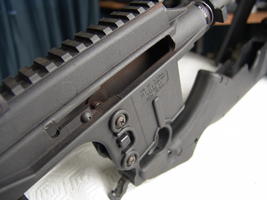 Now push rearward on the gas tube, and angle it even farther upwards. The bolt carrier and gas piston assemblies will come out in one piece. Without the bolt carrier installed, the rifle's receiver should look like this.
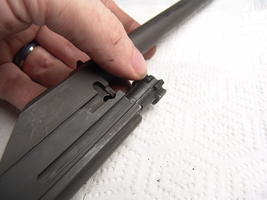 Now, pull the bolt as far forward as it'll go. This is so that the right side plate can come off.
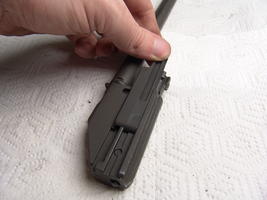 Slide the plate forward. On mine, the lugs on my bolt didn't really want to get completely out of its way, so I had to flex the plate upwards a bit to slide it off.
 See the pin that's been revealed by sliding the plate off? Removing this pin is your next objective.
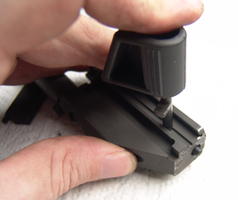 The charging handle actually happens to have a perfect-sized pin for pushing this pin out. There should be very little resistance, as it's primarily held in place by a rubber o-ring / washer.
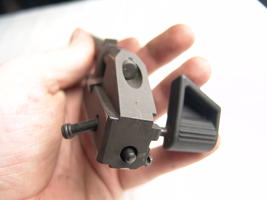 Halfway through pushing the pin out.
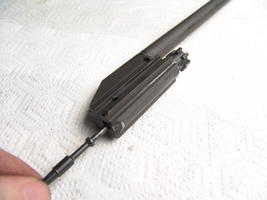 The next step is to remove the firing pin. Note the orientation of the flat towards the rear - the pin you just removed fits between the two bumps of this pin.
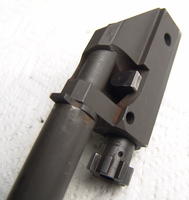 This is a view of the bolt carrier. Make sure you've pushed the bolt to the rear as it (mostly) is in this picture.
 Now, pull out this part. The firing pin was holding it in place. Its purpose is to ensure that the bolt pivots as it goes into battery, so that the locking barrel lugs will can hold the bolt firmly against the bolt face.
 Next, take the bolt and pull it out.
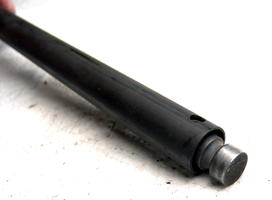 The next step is to remove the gas piston's head. Notice the hole above.
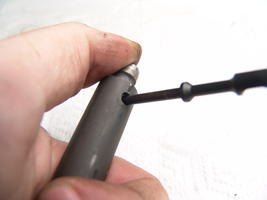 You may have to pivot it a bit, but you will see a pin holding the gas piston's head onto the shaft. This pin is only held in place by spring pressure, and can be pushed out without considerable force.
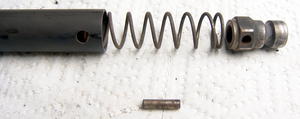 This is the piston head assembly. This is the only part of the SU-16 I disassembled that was under spring pressure, and there really wasn't a lot of it.
 This is a picture of the entire piston assembly, disassembled. This is what it should look like once you're done.
Comparison of the SU-16 Bolt Group with the AR-15's
There's a lot of misinformation out there about exactly what is and isn't compatible between the SU-16 and the AR-15. Therefore, I've taken these pictures in order to dispel any myths which are out there.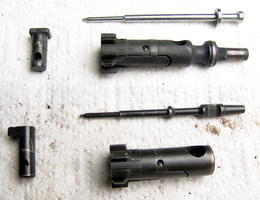 This is the entire bolt group from both weapons (AR on top). At a glance, you can see that although there are similarities in the bolt, neither one is truly interchangeable.
 These are the two firing pins. Notice that they are completely different - while it might be possible to cut down an AR-15 pin to fit loosely into an SU-16, it wouldn't work very well even if it worked at all.
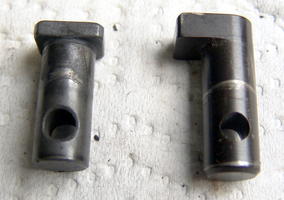 The two bolt cam pins. I am fairly confident that the AR-15 piece (left) could be cut down to fit into an SU-16's bolt group. However, as it stands, neither will operate in the other. The SU-16's top is too high to clear the gas impingement tube on the bolt carrier, and the AR-15's has a protrusion on both sides, instead of just one.
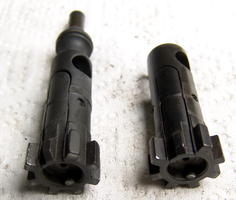 Both bolts, with the AR-15 on the left. Because the SU-16 doesn't use gas impingement, it doesn't need the three-washer system to gasses from going past the bolt, and as such the SU-16 bolt seems to be identical in dimension and parts to the AR-15 bolt, up to the point where it's cut off.
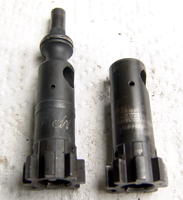 A view of the other side of the bolts.
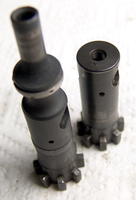 A top-down view of the two bolts. I have heard that the parts of the bolt (minus the body) will interchange between the AR and SU-16, and I do believe that to be true based upon my analysis.
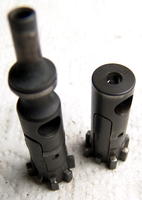 A top-down view of the two bolts from the other side.
 Demonstrating that the SU-16's bolt cam pin will fit into the AR-15's bolt.
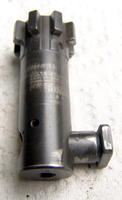 Demonstrating that the AR-15's bolt cam pin will fit into the SU-16's bolt.
-- SeanNewton - 21 Sep 2008
| I | Attachment | Action | Size | Date | Who | Comment |
|---|---|---|---|---|---|---|
| |
a_dsc01799.jpg | manage | 14 K | 21 Sep 2008 - 09:38 | SeanNewton | |
| |
a_dsc01803.jpg | manage | 8 K | 21 Sep 2008 - 09:38 | SeanNewton | |
| |
a_dsc01804.jpg | manage | 6 K | 21 Sep 2008 - 09:38 | SeanNewton | |
| |
a_dsc01811.jpg | manage | 10 K | 21 Sep 2008 - 09:38 | SeanNewton | |
| |
a_dsc01812.jpg | manage | 18 K | 21 Sep 2008 - 09:38 | SeanNewton | |
| |
a_dsc01815.jpg | manage | 24 K | 21 Sep 2008 - 09:38 | SeanNewton | |
| |
a_dsc01819.jpg | manage | 16 K | 21 Sep 2008 - 09:38 | SeanNewton | |
| |
a_dsc01822.jpg | manage | 14 K | 21 Sep 2008 - 09:38 | SeanNewton | |
| |
a_dsc01823.jpg | manage | 18 K | 21 Sep 2008 - 09:38 | SeanNewton | |
| |
a_dsc04769.jpg | manage | 23 K | 21 Sep 2008 - 09:38 | SeanNewton | |
| |
a_dsc04770.jpg | manage | 27 K | 21 Sep 2008 - 09:38 | SeanNewton | |
| |
a_dsc04772.jpg | manage | 27 K | 21 Sep 2008 - 09:38 | SeanNewton | |
| |
a_dsc04774.jpg | manage | 18 K | 21 Sep 2008 - 09:38 | SeanNewton | |
| |
a_dsc04778.jpg | manage | 22 K | 21 Sep 2008 - 09:38 | SeanNewton | |
| |
a_dsc04779.jpg | manage | 21 K | 21 Sep 2008 - 09:38 | SeanNewton | |
| |
a_dsc04781.jpg | manage | 15 K | 21 Sep 2008 - 09:38 | SeanNewton | |
| |
a_dsc04783.jpg | manage | 23 K | 21 Sep 2008 - 09:38 | SeanNewton | |
| |
a_dsc04784.jpg | manage | 25 K | 21 Sep 2008 - 09:38 | SeanNewton | |
| |
a_dsc04786.jpg | manage | 21 K | 21 Sep 2008 - 09:38 | SeanNewton | |
| |
a_dsc04787.jpg | manage | 16 K | 21 Sep 2008 - 09:38 | SeanNewton | |
| |
a_dsc04791.jpg | manage | 24 K | 21 Sep 2008 - 09:38 | SeanNewton | |
| |
a_dsc04793.jpg | manage | 21 K | 21 Sep 2008 - 09:38 | SeanNewton | |
| |
a_dsc04794.jpg | manage | 17 K | 21 Sep 2008 - 09:38 | SeanNewton | |
| |
a_dsc04798.jpg | manage | 18 K | 21 Sep 2008 - 09:38 | SeanNewton | |
| |
a_dsc04800.jpg | manage | 24 K | 21 Sep 2008 - 09:38 | SeanNewton | |
| |
a_dsc04801.jpg | manage | 22 K | 21 Sep 2008 - 09:38 | SeanNewton | |
| |
a_dsc04802.jpg | manage | 25 K | 21 Sep 2008 - 09:38 | SeanNewton | |
| |
a_dsc04803.jpg | manage | 19 K | 21 Sep 2008 - 09:38 | SeanNewton | |
| |
a_dsc04804.jpg | manage | 16 K | 21 Sep 2008 - 09:38 | SeanNewton | |
| |
a_dsc04805.jpg | manage | 16 K | 21 Sep 2008 - 09:38 | SeanNewton | |
| |
a_dsc04807.jpg | manage | 22 K | 21 Sep 2008 - 09:38 | SeanNewton | |
| |
a_dsc04811.jpg | manage | 14 K | 21 Sep 2008 - 09:39 | SeanNewton | |
| |
a_dsc04812.jpg | manage | 14 K | 21 Sep 2008 - 09:39 | SeanNewton | |
| |
a_dsc04815.jpg | manage | 15 K | 21 Sep 2008 - 09:39 | SeanNewton | |
| |
a_dsc04816.jpg | manage | 16 K | 21 Sep 2008 - 09:39 | SeanNewton | |
| |
a_dsc04817.jpg | manage | 25 K | 21 Sep 2008 - 09:39 | SeanNewton | |
| |
a_dsc04818.jpg | manage | 14 K | 21 Sep 2008 - 09:39 | SeanNewton | |
| |
a_dsc04819.jpg | manage | 14 K | 21 Sep 2008 - 09:39 | SeanNewton | |
| |
a_dsc04821.jpg | manage | 14 K | 21 Sep 2008 - 09:39 | SeanNewton | |
| |
a_dsc04824.jpg | manage | 23 K | 21 Sep 2008 - 09:39 | SeanNewton | |
| |
a_dsc04825.jpg | manage | 21 K | 21 Sep 2008 - 09:39 | SeanNewton | |
| |
a_dsc04829.jpg | manage | 14 K | 21 Sep 2008 - 09:38 | SeanNewton | |
| |
a_dsc04833.jpg | manage | 12 K | 21 Sep 2008 - 09:38 | SeanNewton | |
| |
a_dsc04834.jpg | manage | 13 K | 21 Sep 2008 - 09:38 | SeanNewton | |
| |
a_dsc04842.jpg | manage | 31 K | 21 Sep 2008 - 09:38 | SeanNewton | |
| |
a_dsc04843.jpg | manage | 13 K | 21 Sep 2008 - 09:38 | SeanNewton | |
| |
a_dsc04844.jpg | manage | 26 K | 21 Sep 2008 - 09:38 | SeanNewton | |
| |
a_dsc04846.jpg | manage | 32 K | 21 Sep 2008 - 09:38 | SeanNewton | |
| |
a_dsc04847.jpg | manage | 23 K | 21 Sep 2008 - 09:38 | SeanNewton | |
| |
a_dsc04849.jpg | manage | 19 K | 21 Sep 2008 - 09:38 | SeanNewton | |
| |
a_dsc04850.jpg | manage | 12 K | 21 Sep 2008 - 09:38 | SeanNewton | |
| |
a_dsc04852.jpg | manage | 12 K | 21 Sep 2008 - 09:38 | SeanNewton | |
| |
a_dsc04854.jpg | manage | 8 K | 21 Sep 2008 - 09:38 | SeanNewton | |
| |
a_dsc04856.jpg | manage | 12 K | 21 Sep 2008 - 09:38 | SeanNewton | |
| |
a_dsc04858.jpg | manage | 17 K | 21 Sep 2008 - 09:38 | SeanNewton | |
| |
a_dsc04859.jpg | manage | 16 K | 21 Sep 2008 - 09:38 | SeanNewton |
Edit | Attach | Print version | History: r4 < r3 < r2 < r1 | Backlinks | View wiki text | Edit wiki text | More topic actions
Topic revision: r4 - 20 Dec 2011, SeanNewton
%META:TOPICINFO{author="ProjectContributor" date="1231502400" format="1.1" version="1"}%
 Copyright © by the contributing authors. All material on this collaboration platform is the property of the contributing authors.
 Ideas, requests, problems regarding Foswiki? Send feedback


