|
|
You are here: Foswiki>Gunwiki Web>ArticleIndexByGun>RefAKFamily>ProcInstallBipodSaiga (20 May 2012, SeanNewton)Edit Attach
Installing a Harris Bipod on a Saiga
Unfortunately for Saiga owners, Harris doesn't make any standard bipod mount for the Saiga rifle. Most folks would simply drill a hole into the plastic and use one of the screw-in mounts. However, since there's already a sling mount hole in the perfect place for a bipod mount, my friend really wanted a Harris bipod installed through that hole. This article, is about how we made it happen.Legality: Saigas, Bipods, and 922(r)
A far more in-depth treatment of 922(r) is found under LegalFederal922rFeatures. For this specific article, it's enough to bring up the salient points as applied to this conversion. Saiga rifles are imported from Russia as "sporting" firearms, so making non-sporting alterations to a Saiga which hasn't been converted into a domestic rifle (i.e. through replacing all but 10 or fewer of the counted parts) would be strictly prohibited. Integrated bipods (such as the G3 wide forearm with integrated bipod) are restricted military features under 922(r). However, as per written ATF opinion, detachable bipods such as Harris bipods are sporting accessories and do not trigger violations of the 922(r) "sporting purpose" clause. It's also worth noting that California does not prohibit bipods on rifles. Given that a lot of folks here somehow think that bipods are restricted features, I felt the need to make this assertion.Starting the Project
Necessary in order to finish this project:- Saiga rifle (or, at least, the foreend of one)
- Harris model 2R bipod adapter. There may be others which will work, but I have already done this procedure with a 2R.
- Harris or Harris-compatible bipod (optional; you don't need it to complete the project)
- Harris-compatible sling mount (optional; you will probably want it if you want to connect a sling to the sling mount on the bipod)
- A punch, to make marks on the plastic. You could substitute a small nail, of course.
- A crescent wrench, in order to tighten down the bipod stud to the mounting plate.
- Optionally, a small crush washer.
- A drill press, or possibly a dremel tool
- An end mill (I used one from Sears in my drill press)
- A vise suitable for sliding around the work piece on the drill press's plate.
Saiga foreend, pre-modification
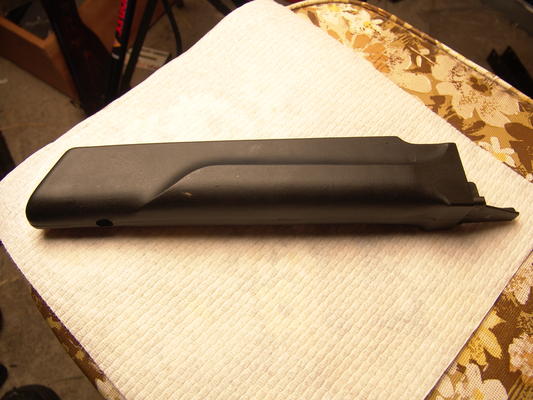 In the picture, the foreend is facing left. The rear end of the foreend is easily distinguished from an AK foreend by the spring in the rear. The spring presses against the front trunion, and there are some mounting pegs on the rifle's gas block which connect to some slots on the front of the foreend.
Saiga foreend, disassembled with bipod adapter
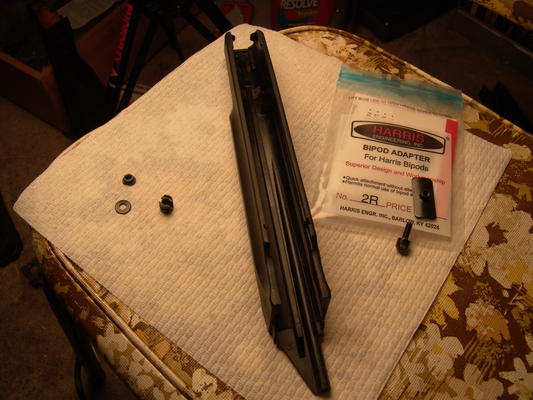 On the left in this picture, you'll find the disassembled parts of the Saiga sling mount. Some of the hardware gets re-used when installing the Harris bipod mount. On the right, you'll find the 2R bipod adapter and the mounting plate which it screws into. The adapter fits, but the mounting plate requires some modifications to the foreend before it will fit.
Marking the Cuts
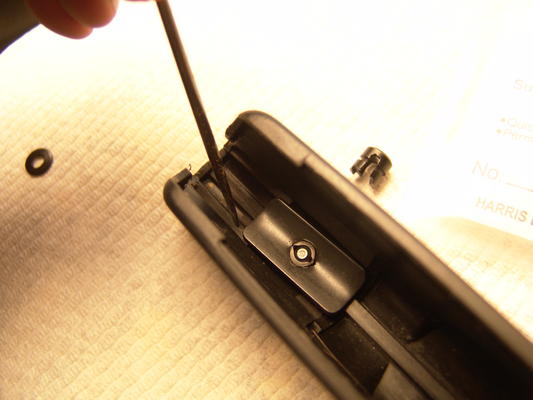 As you can see here, I'm using a pin punch to make a small hole on the inside of the forearm, where the internal protrusions prevent the mounting plate from screwing down. This is in order to guide the process of milling out the protrusions on the drill press.
One cut made, the other marked
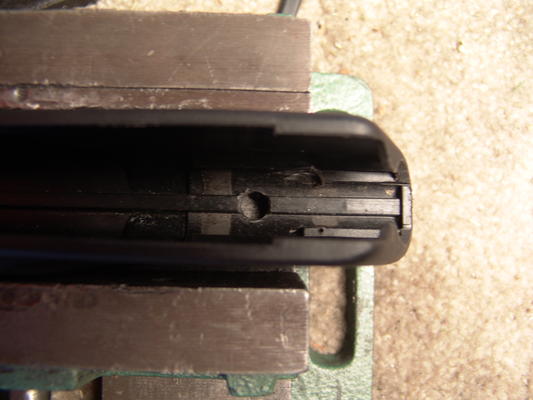 In this picture, one of the internal forearm rails has been milled off and the other one is marked.
Both cuts made; mounting plate positioned
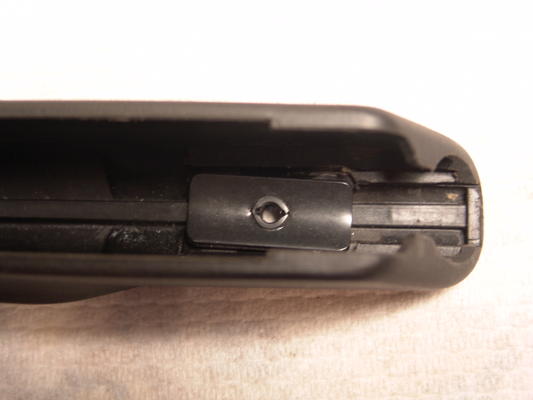 Both internal rails have been milled down to fit the mounting plate. The plate has been positioned, with the protrusion going through the existing sling hole in the foreend
Hardware used on the other side
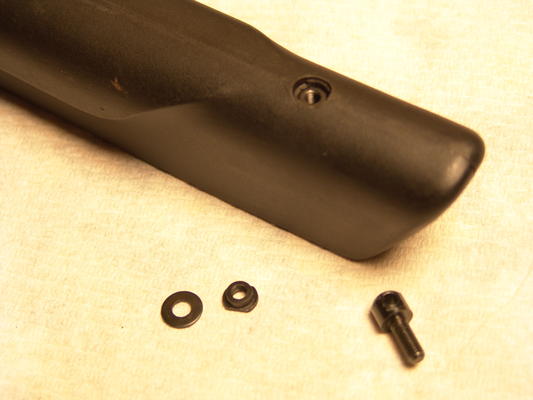 The 'washer-like' metal disc is unused in the Harris bipod mount. However, you do use the collar-like piece of metal to the right of the 'washer'.
Screwing the bipod stud into the mounting plate
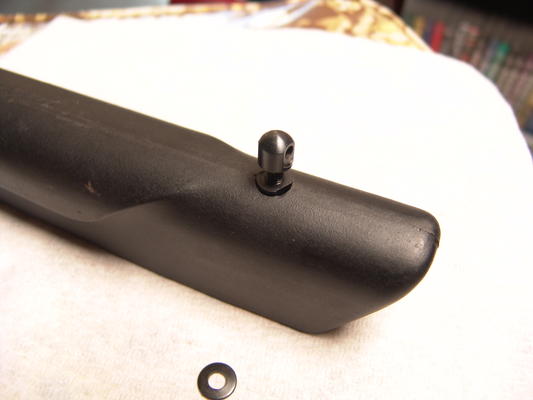 Because the 'hole' sides of the bipod stud are flat, it's possible to use a crescent wrench to screw the bipod stud to the mounting plate. Tighten the bipod stud down until it's firm, and the holes are facing outward at right angles to the barrel of the rifle. Optionally, you may want a small crush washer between the stud and the handguard for the firmest possible connection.
The Completed Project
 A Saiga, assembled with the Harris bipod attached to the stud we placed in the foreend and a Kobra red dot sight. The rifle in question had also been previously modified to accept AK-47 magazines.
-- SeanNewton - 23 Jan 2008


| I | Attachment | Action | Size | Date | Who | Comment |
|---|---|---|---|---|---|---|
| |
s_dsc09301.jpg | manage | 35 K | 23 Jan 2008 - 07:41 | SeanNewton | Saiga foreend |
| |
s_dsc09307.jpg | manage | 39 K | 23 Jan 2008 - 07:47 | SeanNewton | |
| |
s_dsc09312.jpg | manage | 25 K | 23 Jan 2008 - 07:56 | SeanNewton | |
| |
s_dsc09325.jpg | manage | 27 K | 23 Jan 2008 - 07:56 | SeanNewton | |
| |
s_dsc09334.jpg | manage | 16 K | 23 Jan 2008 - 07:57 | SeanNewton | |
| |
s_dsc09335.jpg | manage | 21 K | 23 Jan 2008 - 07:57 | SeanNewton | |
| |
s_dsc09338.jpg | manage | 17 K | 23 Jan 2008 - 07:58 | SeanNewton | |
| |
s_dsc09349.jpg | manage | 31 K | 23 Jan 2008 - 07:58 | SeanNewton |
Edit | Attach | Print version | History: r4 < r3 < r2 < r1 | Backlinks | View wiki text | Edit wiki text | More topic actions
Topic revision: r4 - 20 May 2012, SeanNewton
%META:TOPICINFO{author="ProjectContributor" date="1231502400" format="1.1" version="1"}%
Ideas, requests, problems regarding Foswiki? Send feedback